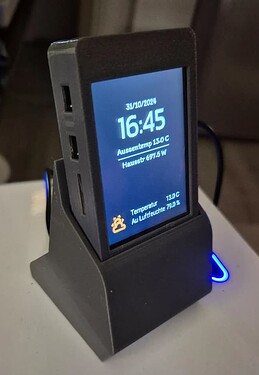
CYD Cheap Yellow Display mit Home Assistant und ESP Home

Hi, ich habe das zwar auch schon einmal an anderer Stelle vorgestellt, aber es gibt bestimmt auch hier Mitglieder die sich für solche Bastelsachen interessieren. :slight_smile:

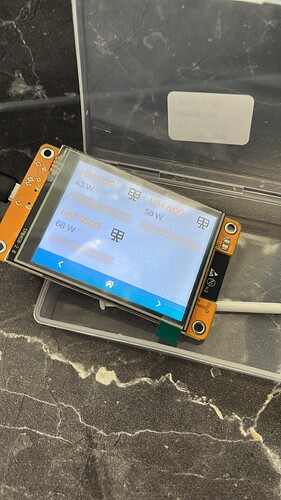
In der HA Community habe ich ein interessantes Projekt gefunden. Über ESP-Home kann man das CYD Display in Home Assistant integrieren. Man hat im Anschluss zwei konfigurierbare Seiten, eine Startseite und eine Seite für Buttons aller Art. Hier der Link zum Projekt: CYD/Habbit Device to control HA - Share your Projects! - Home Assistant Community

Ich habe das mal versucht umzusetzen nach dieser Anleitung: Integrar la Cheap Yellow Display en HA - Aguacatec

Das hat auch gut funktioniert, aber zum Anfang gab es Schwierigkeiten mit der Darstellung des Displays. Das ist halt immer abhängig vom genutzten board. Nach etwas ausprobieren und lesen habe ich für mein Display die Settings für model und rotation im Code wie folgt geändert:

display:
  - platform: ili9xxx
    id: esp_display
    model: ili9341
    spi_id: tft
    cs_pin: GPIO15
    dc_pin: GPIO2
    rotation: 0
    invert_colors: false
    lambda: |-

Nun wurde auch der Code korrekt auf dem Display dargestellt. Also habe ich begonnen das Setup des Displays selber vorzunehmen und meine Entitäten aus HA entsprechend umgeschrieben bzw. ergänzt.

Dabei ist mir auch aufgefallen, dass die letzten beiden Button auf der zweiten Seite von der Anordnung her nicht stimmen und nur in den Ecken gedrückt werden konnten. Das habe ich entsprechend korrigiert. Hier meine quick and dirty angepasste Version:

esphome:
  name: cyd
  friendly_name: CYD Schlafzimmer

esp32:
  board: esp32dev
  framework:
    type: arduino

# Enable logging
logger:

# Enable Home Assistant API
api:
  encryption:
    key: "secret"

ota:
  - platform: esphome
    password: "secret"

wifi:
  ssid: "secret"
  password: "secret"

  # Enable fallback hotspot (captive portal) in case wifi connection fails
  ap:
    ssid: "Cyd Fallback Hotspot"
    password: "LEMTsad123"

captive_portal:

globals:
  - id: show_return_page
    type: bool
    restore_value: yes
    initial_value: "false"

# Setup a pin to control the backlight and the LED
output:
  - platform: ledc
    pin: GPIO21
    id: backlight_pwm
  - platform: ledc
    id: output_red
    pin: GPIO4
    inverted: true
  - platform: ledc
    id: output_green
    pin: GPIO16
    inverted: true
  - platform: ledc
    id: output_blue
    pin: GPIO17
    inverted: true

light:
  - platform: monochromatic
    output: backlight_pwm
    name: Display Backlight
    id: backlight
    restore_mode: ALWAYS_ON
  - platform: rgb
    name: LED
    red: output_red
    id: led
    green: output_green
    blue: output_blue
    restore_mode: ALWAYS_OFF

# Setup SPI for the display. The ESP32-2432S028R uses separate SPI buses for display and touch
spi:
  - id: tft
    clk_pin: GPIO14
    mosi_pin: GPIO13
    miso_pin: GPIO12
  - id: touch
    clk_pin: GPIO25
    mosi_pin: GPIO32
    miso_pin: GPIO39

touchscreen:
  platform: xpt2046
  spi_id: touch
  cs_pin: GPIO33
  interrupt_pin: GPIO36
  update_interval: 50ms
  threshold: 400
  calibration:
    x_min: 3860
    x_max: 280
    y_min: 340
    y_max: 3860
  transform:
    swap_xy: false   

# Create a font to use, add and remove glyphs as needed. 
# Crea las fuente que quieres utilizar, añade o quita los caracteres que necesites.

font:
  - file: "gfonts://Itim"
    id: fecha
    size: 15
  - file: "gfonts://Itim"
    id: fetcha
    size: 17  
  - file: "gfonts://Kanit"
    id: hora
    size: 60
  - file: "gfonts://Roboto"
    id: info
    size: 15
  - file: "gfonts://Roboto"
    id: botones
    size: 11

# Create the colors you want to use.
# Crea los colores que quieres utilizar.

color:
  - id: black
    hex: '000000'
  - id: orange
    hex: 'eb9c17'
  - id: red
    hex: 'b20b23'
  - id: green
    hex: '148e23'  
  - id: grey
    hex: '464646'
    
# Create the icons you want to use.
# Crea los iconos que quieres utilizar.

image:
  - file: mdi:home-thermometer
    id: hometemperature
    resize: 40x40
  - file: mdi:weather-partly-cloudy
    id: weather
    resize: 40x40
  - file: mdi:solar-power-variant
    id: finance
    resize: 40x40
  - file: mdi:transmission-tower
    id: health
    resize: 40x40
  - file: mdi:page-previous
    id: back
    resize: 40x40
  - file: mdi:lightbulb-group-off-outline
    id: fan
    resize: 40x40
  - file: mdi:floor-lamp-torchiere
    id: thermostat
    resize: 40x40
  - file: mdi:mirror-rectangle
    id: vacuum
    resize: 40x40
  - file: mdi:led-strip-variant
    id: desk
    resize: 40x40
  - file: mdi:desk-lamp
    id: printer
    resize: 40x40
  - file: mdi:lightbulb
    id: printer3d
    resize: 40x40
  - file: mdi:home-assistant
    id: habbit
    resize: 40x40

# Replace the home gif as you want.
# Reemplaza el gif the inicio como quieras.

#animation:
#  - file: "habbit.gif"
#    id: ha
#    resize: 70x70
#    type: TRANSPARENT_BINARY

# This will fetch time from Home Assistant
time:
  - platform: homeassistant
    id: esptime

# Create sensors from HA you want to use and show.
# Crea los sensores de HA que quieres utilizar y mostrar.

sensor:
  - platform: homeassistant
    id: temperatura
    entity_id: sensor.wandthermostat_jan_temperatur
    internal: true
  - platform: homeassistant
    id: humedad
    entity_id: sensor.wandthermostat_jan_luftfeuchtigkeit
    internal: true
  - platform: homeassistant
    id: tempexterior
    entity_id: sensor.aussentemperatur_temperatur
    internal: true
  - platform: homeassistant
    id: problluvia
    entity_id: sensor.aussentemperatur_luftfeuchtigkeit
    internal: true
  - platform: homeassistant
    id: solarkwh
    entity_id: sensor.homestation_solar_total_energie_heute
    internal: true
  - platform: homeassistant
    id: netzeinsp
    entity_id: sensor.solar_netzeinspeisung_kwh_taglich
    internal: true
  - platform: homeassistant
    id: weight
    entity_id: sensor.stromverbrauch_taglich
    internal: true
  - platform: homeassistant
    id: distancia
    entity_id: sensor.stromverbrauch_gesamt_kwh
    internal: true
  - platform: homeassistant
    id: totalstrom
    entity_id: sensor.total_power_nur_verbrauch
    internal: true

text_sensor:
  - platform: homeassistant
    id: aireacondicionado
    entity_id: scene.lichtgruppe_wohnzimmer_aus
    internal: true
  - platform: homeassistant
    id: calefaccion
    entity_id: light.schlafzimmerlicht
    internal: true
  - platform: homeassistant
    id: aspirador
    entity_id: switch.bad_spiegellicht
    internal: true
  - platform: homeassistant
    id: escritorio
    entity_id: light.wandlicht
    internal: true
  - platform: homeassistant
    id: impresora
    entity_id: switch.pc_led_pv_led
    internal: true
  - platform: homeassistant
    id: impresora3d
    entity_id: light.couchlicht
    internal: true

# Assigns a function to each button, by calling the corresponding service in HA.
# Asigna una función a cada botón, llamando al servicio correspondiente en HA.

binary_sensor:
  - platform: touchscreen
    name: Button 1
    x_min: 0
    x_max: 140
    y_min: 0
    y_max: 65
    on_press:
      then:
        - if:
            condition:
              lambda: 'return !id(show_return_page);'
            then:
              - globals.set:
                  id: show_return_page
                  value: !lambda "return !id(show_return_page);"
            else:
              - homeassistant.service:
                  service: scene.toggle
                  data:
                    entity_id: scene.lichtgruppe_wohnzimmer_aus
  - platform: touchscreen
    name: Button 2
    x_min: 140
    x_max: 280
    y_min: 0
    y_max: 65
    on_press:
      then:
        - if:
            condition:
              lambda: 'return !id(show_return_page);'
            then:
              - globals.set:
                  id: show_return_page
                  value: !lambda "return !id(show_return_page);"
            else:
              - homeassistant.service:
                  service: light.toggle
                  data:
                    entity_id: light.schlafzimmerlicht
  - platform: touchscreen
    name: Button 3
    x_min: 0
    x_max: 140
    y_min: 65
    y_max: 130
    on_press:
      then:
        - if:
            condition:
              lambda: 'return !id(show_return_page);'
            then:
              - globals.set:
                  id: show_return_page
                  value: !lambda "return !id(show_return_page);"
            else:
              - homeassistant.service:
                  service: switch.toggle
                  data:
                    entity_id: switch.bad_spiegellicht
  - platform: touchscreen
    name: Button 4
    x_min: 140
    x_max: 280
    y_min: 65
    y_max: 130
    on_press:
      then:
        - if:
            condition:
              lambda: 'return !id(show_return_page);'
            then:
              - globals.set:
                  id: show_return_page
                  value: !lambda "return !id(show_return_page);"
            else:
              - homeassistant.service:
                  service: light.toggle
                  data:
                    entity_id: light.wandlicht
  - platform: touchscreen
    name: Button 5
    x_min: 0
    x_max: 140
    y_min: 130
    y_max: 195
    on_press:
      then:
        - if:
            condition:
              lambda: 'return !id(show_return_page);'
            then:
              - globals.set:
                  id: show_return_page
                  value: !lambda "return !id(show_return_page);"
            else:
              - homeassistant.service:
                  service: switch.toggle
                  data:
                    entity_id: switch.pc_led_pv_led
  - platform: touchscreen
    name: Button 6
    x_min: 140
    x_max: 280
    y_min: 130
    y_max: 195
    on_press:
      then:
        - if:
            condition:
              lambda: 'return !id(show_return_page);'
            then:
              - globals.set:
                  id: show_return_page
                  value: !lambda "return !id(show_return_page);"
            else:
              - homeassistant.service:
                  service: light.toggle
                  data:
                    entity_id: light.couchlicht
  - platform: touchscreen
    name: Button 7
    x_min: 0
    x_max: 140
    y_min: 195
    y_max: 260
    on_press:
      then:
        - if:
            condition:
              lambda: 'return !id(show_return_page);'
            then:
              - globals.set:
                  id: show_return_page
                  value: !lambda "return !id(show_return_page);"
  - platform: touchscreen
    name: Button 8
    x_min: 140
    x_max: 280
    y_min: 195
    y_max: 260
    on_press:
      then:
        - globals.set:
            id: show_return_page
            value: !lambda "return !id(show_return_page);"

# Setup the ili9xxx platform
# Display is used as 240x320 by default so we rotate it to 90°     model: ili9342 changed to model: ili9341

display:
  - platform: ili9xxx
    id: esp_display
    model: ili9341
    spi_id: tft
    cs_pin: GPIO15
    dc_pin: GPIO2
    rotation: 0
    invert_colors: false
    lambda: |-
      if (id(show_return_page)) {
        int button_width = 100;
        int button_height = 65;
        int x_start = 15;
        int y_start = 15;
        int x_padding = 10;
        int y_padding = 10;

        // Define los textos para los botones
        const char* button_texts[] = {
          "Wohnzimmer",
          "Schlafzimmer",
          "Badlicht",
          "Wandlicht",
          "PC-Licht",
          "Couchlicht",
          "Free",
          "Start"
        };

        for (int row = 0; row < 4; row++) {
          for (int col = 0; col < 2; col++) {
            int button_index = row * 2 + col;
            int x = x_start + col * (button_width + x_padding);
            int y = y_start + row * (button_height + y_padding);
            it.rectangle(x, y, button_width, button_height, id(grey));
            int text_width = strlen(button_texts[button_index]) * 5.5; 
            int text_height = 16; 
            it.print(x + (button_width - text_width) / 2, y + (button_height - text_height) / 2 + 20, id(botones), button_texts[button_index]);
          }
        }
        if (id(aireacondicionado).state == "on") {
          it.image(45, 20, id(fan), id(orange));
        } else {
          it.image(45, 20, id(fan), id(grey));
        }
        if (id(calefaccion).state == "on") {
          it.image(155, 20, id(thermostat), id(orange));
        } else {
          it.image(155, 20, id(thermostat), id(grey));
        }
        if (id(aspirador).state == "on") {
          it.image(45, 95, id(vacuum), id(orange));
        } else {
          it.image(45, 95, id(vacuum), id(grey));
        }
        if (id(escritorio).state == "on") {
          it.image(155, 95, id(desk), id(orange));
        } else {
          it.image(155, 95, id(desk), id(grey));
        }
        if (id(impresora).state == "on") {
          it.image(45, 170, id(printer), id(orange));
        } else {
          it.image(45, 170, id(printer), id(grey));
        }
        if (id(impresora3d).state == "on") {
          it.image(155, 170, id(printer3d), id(orange));
        } else {
          it.image(155, 170, id(printer3d), id(grey));
        }
        it.image(45, 245, id(habbit), id(grey));
        it.image(155, 245, id(back), id(green));

      } else {
        static int y = 182;
        static int y_direction = 4;  // Velocidad del movimiento
        const int y_min = 180;       
        const int y_max = 187;       

        it.fill(id(black));
        it.strftime(120, 55, id(fecha), TextAlign::CENTER, "%d/%m/%Y", id(esptime).now());
        it.strftime(120, 92, id(hora), TextAlign::CENTER, "%H:%M", id(esptime).now());
        it.printf(120, 135, id(fetcha), TextAlign::CENTER, "Aussentemp %.1f C", id(tempexterior).state);
        it.line(50, 150, 190, 150);
        it.printf(120, 163, id(fetcha), TextAlign::CENTER, "Hausstr %.1f W", id(totalstrom).state);
        
        static int current_text_index = 0;
        static float text_timer = 0;
        const float text_interval = 4.0;  // Intervalo para cambiar el texto en segundos

        text_timer += 1.0;  
        if (text_timer >= text_interval) {
          text_timer = 0;
          current_text_index = (current_text_index + 1) % 4;  // Alternar entre cuatro textos
        }

        if (current_text_index == 0) {
          it.image(15, 260, id(hometemperature), id(orange));
          it.print(70, 260, id(info), "Temperatur");
          it.printf(175, 260, id(info), "%.1f C", id(temperatura).state);
          it.print(70, 280, id(info), "Luftfeuchte");
          it.printf(175, 280, id(info), "%.1f %%", id(humedad).state);
        } else if (current_text_index == 1) {
          it.image(15, 260, id(weather), id(orange));
          it.print(70, 260, id(info), "Temperatur");
          it.printf(175, 260, id(info), "%.1f C", id(tempexterior).state);
          it.print(70, 280, id(info), "Au Luftfeuchte");
          it.printf(175, 280, id(info), "%.1f %%", id(problluvia).state);
        } else if (current_text_index == 2) {
          it.image(15, 260, id(finance), id(green));
          it.print(70, 260, id(info), "Solarertrag");
          it.printf(175, 260, id(info), "%.1f kWh", id(solarkwh).state);
          it.print(70, 280, id(info), "Einspeisung");
          it.printf(175, 280, id(info), "%.1f kWh", id(netzeinsp).state);
        } else if (current_text_index == 3) {
          it.image(15, 260, id(health), id(red));
          it.print(70, 260, id(info), "Strom heute");
          it.printf(175, 260, id(info), "%.1f kWh", id(weight).state);
          it.print(70, 280, id(info), "Strom total");
          it.printf(175, 280, id(info), "%.1f kWh", id(distancia).state);
        }
      }

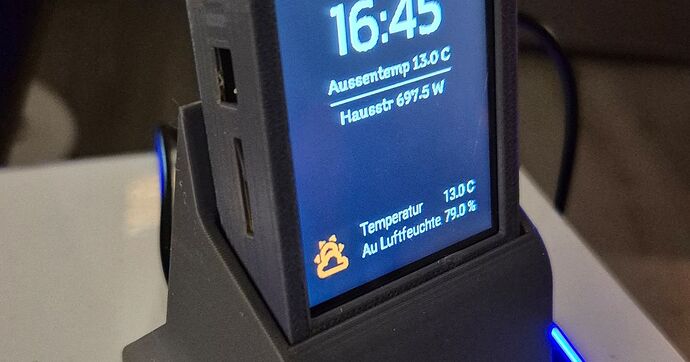
Zum Abschluß brauchte ich natürlich noch ein passendes Gehäuse. Ich habe den Ständer selber gezeichnet und ein fertiges Gehäuse dazu ausgedruckt. Das Gehäuse ist auf meiner Druckseite mit verlinkt.

Printables.com

ESP32 2.8 inch CYD Display Stand by Jay | Download free STL model |…

Display Stand for ESP32-2432S028 | Download free 3D printable STL models

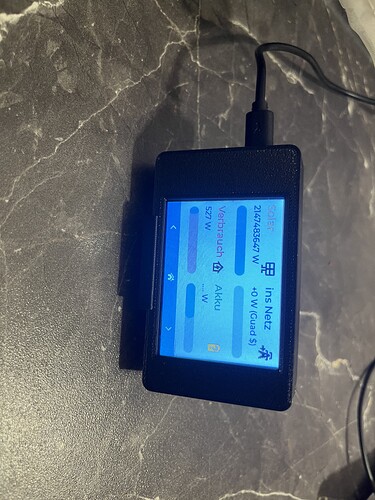
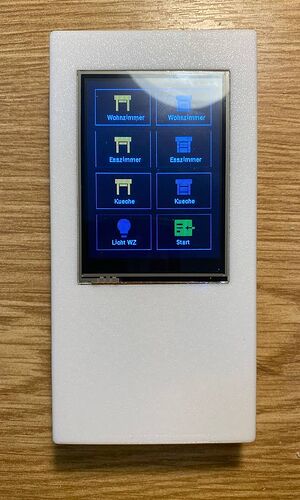
Jetzt steht das Display auf meinem Nachttisch und zeigt mir die wichtigsten Daten an. Auf Seite zwei habe ich die Hauptlichter hinterlegt.
Vielleicht hat ja der ein oder andere Interesse bzw. Lust so etwas zu basteln. :slight_smile:

Grüße Jayson

2 „Gefällt mir“

Grüße doch Jayson :slight_smile:
auch hier gilt: Projekte mit einem 3D Drucker sind die besten Projekte :smiley:

Danke für das Teilen. Hat Spaß gemacht zu lesen.
Wahnsinn was alles möglich ist.

Hi, sei gegrüßt. Freut mich wenn es Anklang findet. :slight_smile: Ist schon eher was für Bastler, aber schon genial und die Kosten liegen bei ca. 15€. ESPs erlauben wirklich viel. Ja und 3D Drucker sind auch eine richtig feine Sache, nutze ich inzwischen auch schon über 10 Jahre.

1 „Gefällt mir“

funktioniert zuverlässig. Danke für den Tipp

  • Den automatischen Ansichtswechsel habe ich weggelassen.
  • In deinem Code ist noch ein Zahlenvertauscher
    calibration: x_min: 3860 x_max: 280 #muss andersrum rein
  • und dieser Dienstaufruf hat mich lange aufgehalten:
 - homeassistant.service:
     service: cover.open_cover
     data:
       entity_id: cover.rolladen_2 
2 „Gefällt mir“

Sehr schön, die Aufteilung gefällt mir auch sehr gut. Wie hast du die zweite Seite belegt? Oder hast du gleich weggelassen?

calibration: x_min: 3860 x_max: 280

Muss ich nochmal testen, habe da auch eine Weile für gebraucht, die richtigen Werte zu finden. Funktioniert aber eigentlich einwandfrei. Konntest du sonst meinen Code nehmen, dann müssten wir eigentlich das selbe display haben. Danke für den Hinweis, schaue ich mir nochmal genauer an.

display:
  - platform: ili9xxx
    id: esp_display
    model: ili9341

Der Teil mit der calibration hat mich auch etwas aufgehalten muss ich sagen. Aber jetzt läuft es.

Aber tolle Idee und schön umgesetzt!

1 „Gefällt mir“

Na dann zeige her… :slight_smile: Das ist halt wirklich eine gute Sache für ein günstiges Display, wenn man das mal mit diesen kleinen Schalterdisplays vergleicht. Die quadratische Form wäre noch was.

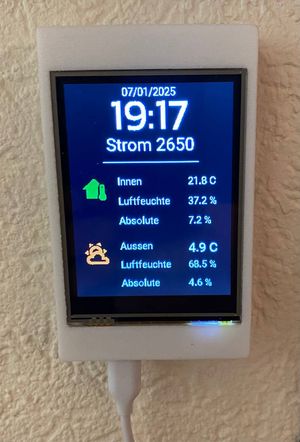
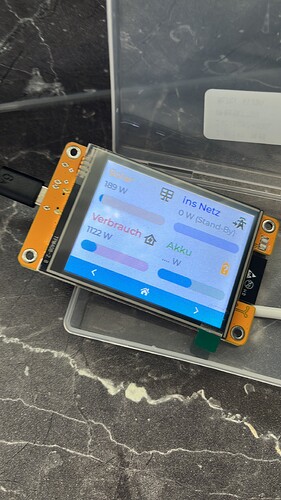
Ach das ist überhaupt nichts besonderes und noch voller Fehler. Eigentlich nur erstmal zum darstellen der solarerträge, wobei man da derzeit nur heulen könnte. Wenn ich dann mal Zeit finde will ich auf nem zweiten Display meine beregnungsanlage einbauen, dass ich, wenn ich im Sommer im/am Gartenhaus n Bier trinke, trockenen Fußes ins Haus komme. Das dritte Display soll in den Flur vom Haus um der standardfrage meiner Frau „sind alle Fenster zu? Ist das Licht aus? Haben wir das Auto geladen“ ne optische Antwort zu geben. Wenn da nicht diese blöde Zeit und die ganzen anderen Projekte wären.


2 „Gefällt mir“

Mit der zweiten Seite steuere ich nur ein paar Rolladen und eine Leuchte.
Hier mein modifizierter etwas vereinfachter Code:
Wenn Interesse besteht kann ich auch die Fusion360 Datei posten

esphome:                         # Stand 07.01.2025
  name: display
  friendly_name: display

esp32:
  board: esp32dev
  framework:
    type: arduino

logger:

api:
  encryption:
    key: "/BSXATeNoYAg7HGn7zWfu01TsHhtQ2L4vZpUIyTtxgw="

ota:
    platform: esphome
    password: "1b805235a7ac84fb9711a70584c2977e"

wifi:
  ssid: !secret wifi_ssid
  password: !secret wifi_password

  ap:
    ssid: "Display Fallback Hotspot"
    password: "OJeDHki1Wid9"

captive_portal:

globals:
  - id: show_return_page
    type: bool
    restore_value: yes
    initial_value: "false"

# Setup a pin to control the backlight and the LED
output:
  - platform: ledc
    pin: GPIO21
    id: backlight_pwm
  - platform: ledc
    id: output_red
    pin: GPIO4
    inverted: true
  - platform: ledc
    id: output_green
    pin: GPIO16
    inverted: true
  - platform: ledc
    id: output_blue
    pin: GPIO17
    inverted: true

light:
  - platform: monochromatic
    output: backlight_pwm
    name: Display Backlight
    id: backlight
    restore_mode: ALWAYS_ON
  - platform: rgb
    name: LED
    red: output_red
    id: led
    green: output_green
    blue: output_blue
    restore_mode: ALWAYS_OFF

# Setup SPI for the display. The ESP32-2432S028R uses separate SPI buses for display and touch
spi:
  - id: tft
    clk_pin: GPIO14
    mosi_pin: GPIO13
    miso_pin: GPIO12
  - id: touch
    clk_pin: GPIO25
    mosi_pin: GPIO32
    miso_pin: GPIO39

touchscreen:
  platform: xpt2046
  spi_id: touch
  cs_pin: GPIO33
  interrupt_pin: GPIO36
  update_interval: 50ms
  threshold: 400
  calibration:
    x_min: 280
    x_max: 3860
    y_min: 340
    y_max: 3860
  transform:
    swap_xy: false   

# verwendete Schriften

font:
  - file: "gfonts://Roboto"
    id: fetcha
    size: 25  
  - file: "gfonts://Kanit"
    id: hora
    size: 60
  - file: "gfonts://Roboto"
    id: info
    size: 15
  - file: "gfonts://Roboto"
    id: info2
    size: 20    
  - file: "gfonts://Roboto"
    id: botones
    size: 11

# Verwendtet Farben

color:
  - id: black
    hex: '000000'
  - id: orange
    hex: 'eb9c17'
  - id: red
    hex: 'b20b23'
  - id: green
    hex: '148e23'  
  - id: grey
    hex: '464646'
    
# verwendete icons 

image:
  - file: mdi:home-thermometer
    id: hometemperature
    resize: 40x40
  - file: mdi:weather-partly-cloudy
    id: weather
    resize: 40x40

  - file: mdi:window-shutter-open
    id: offen
    resize: 40x40
  - file: mdi:window-shutter
    id: zu
    resize: 40x40

  - file: mdi:lightbulb
    id: licht
    resize: 40x40
  - file: mdi:page-previous
    id: back
    resize: 40x40

# Replace the home gif as you want.
#animation:
#  - file: "habbit.gif"
#    id: ha
#    resize: 70x70
#    type: TRANSPARENT_BINARY

# This will fetch time from Home Assistant
time:
  - platform: homeassistant
    id: esptime

# Create sensors from HA you want to use and show.

sensor:
  - platform: homeassistant
    id: innentemperatur
    entity_id: sensor.temp_kuche_temperature   
    internal: true
  - platform: homeassistant
    id: innenluftfeuchte
    entity_id: sensor.temp_kuche_humidity   
    internal: true
  - platform: homeassistant
    id: absolutinnen
    entity_id: sensor.absolute_feuchte_innen  
    internal: true      
  - platform: homeassistant
    id: aussentemperatur
    entity_id: sensor.aussen_temperatur       
    internal: true
  - platform: homeassistant
    id: aussenfeuchte
    entity_id: sensor.aussen_luftfeuchtigkeit  
    internal: true
  - platform: homeassistant
    id: absolutaussen
    entity_id: sensor.absolute_feuchte_aussen  
    internal: true
  - platform: homeassistant
    id: totalstrom
    entity_id: sensor.strom_verbrauch
    internal: true


text_sensor:
  - platform: homeassistant
    id: Licht
    entity_id: switch.licht
    internal: true

# Hier wird geschaltet! 

binary_sensor:
  - platform: touchscreen
    name: Button 1
    x_min: 140 
    x_max: 280 
    y_min: 0
    y_max: 65
    on_press:
      then:
        - if:
            condition:
              lambda: 'return !id(show_return_page);'
            then:
              - globals.set:
                  id: show_return_page
                  value: !lambda "return !id(show_return_page);"
            else:
              - homeassistant.service:
                  service: cover.open_cover
                  data:
                    entity_id: cover.rolladen_1
              - homeassistant.service:
                  service: cover.open_cover
                  data:
                    entity_id: cover.rolladen_2                    
  - platform: touchscreen
    name: Button 2
    x_min: 0
    x_max: 140
    y_min: 0
    y_max: 65
    on_press:
      then:
        - if:
            condition:
              lambda: 'return !id(show_return_page);'
            then:
              - globals.set:
                  id: show_return_page
                  value: !lambda "return !id(show_return_page);"
            else:
              - homeassistant.service:
                  service: cover.close_cover
                  data:
                    entity_id: cover.rolladen_1
              - homeassistant.service:
                  service: cover.close_cover
                  data:
                    entity_id: cover.rolladen_2                    
  - platform: touchscreen
    name: Button 3
    x_min: 140
    x_max: 280
    y_min: 65
    y_max: 130
    on_press:
      then:
        - if:
            condition:
              lambda: 'return !id(show_return_page);'
            then:
              - globals.set:
                  id: show_return_page
                  value: !lambda "return !id(show_return_page);"
            else:
              - homeassistant.service:
                  service: cover.open_cover
                  data:
                    entity_id: cover.rolladen3
  - platform: touchscreen
    name: Button 4
    x_min: 0
    x_max: 140
    y_min: 65
    y_max: 130
    on_press:
      then:
        - if:
            condition:
              lambda: 'return !id(show_return_page);'
            then:
              - globals.set:
                  id: show_return_page
                  value: !lambda "return !id(show_return_page);"
            else:
              - homeassistant.service:
                  service: cover.close_cover
                  data:
                    entity_id: cover.rolladen3
  - platform: touchscreen
    name: Button 5
    x_min: 140
    x_max: 280
    y_min: 130
    y_max: 195
    on_press:
      then:
        - if:
            condition:
              lambda: 'return !id(show_return_page);'
            then:
              - globals.set:
                  id: show_return_page
                  value: !lambda "return !id(show_return_page);"
            else:
              - homeassistant.service:
                  service: cover.open_cover
                  data:
                    entity_id: cover.rolladen6
  - platform: touchscreen
    name: Button 6
    x_min: 0
    x_max: 140
    y_min: 130
    y_max: 195
    on_press:
      then:
        - if:
            condition:
              lambda: 'return !id(show_return_page);'
            then:
              - globals.set:
                  id: show_return_page
                  value: !lambda "return !id(show_return_page);"
            else:
              - homeassistant.service:
                  service: cover.close_cover
                  data:
                    entity_id: cover.rolladen6
  - platform: touchscreen
    name: Button 7
    x_min: 140
    x_max: 280
    y_min: 195
    y_max: 260
    on_press:
      then:
        - if:
            condition:
              lambda: 'return !id(show_return_page);'
            then:
              - globals.set:
                  id: show_return_page
                  value: !lambda "return !id(show_return_page);"
            else:
              - homeassistant.service:
                  service: switch.toggle
                  data:
                    entity_id: switch.licht
  - platform: touchscreen
    name: Button 8
    x_min: 0
    x_max: 140
    y_min: 195
    y_max: 260
    on_press:
      then:
        - globals.set:
            id: show_return_page
            value: !lambda "return !id(show_return_page);"

# Setup the ili9xxx platform
# Display is used as 240x320 by default so we rotate it to 90°     model: ili9342 changed to model: ili9341

display:
  - platform: ili9xxx
    id: esp_display
    model: ili9341
    spi_id: tft
    cs_pin: GPIO15
    dc_pin: GPIO2
    rotation: 0
    invert_colors: false
    lambda: |-
      if (id(show_return_page)) {
        int button_width = 100;
        int button_height = 65;
        int x_start = 15;
        int y_start = 15;
        int x_padding = 10;
        int y_padding = 10;

        // Define los textos para los botones
        const char* button_texts[] = {
          "Wohnzimmer",
          "Wohnzimmer",
          "Esszimmer",
          "Esszimmer",
          "Kueche",
          "Kueche",
          "Licht WZ",
          "Start"
        };

        for (int row = 0; row < 4; row++) {
          for (int col = 0; col < 2; col++) {
            int button_index = row * 2 + col;
            int x = x_start + col * (button_width + x_padding);
            int y = y_start + row * (button_height + y_padding);
            it.rectangle(x, y, button_width, button_height, id(grey));
            int text_width = strlen(button_texts[button_index]) * 5.5; 
            int text_height = 16; 
            it.print(x + (button_width - text_width) / 2, y + (button_height - text_height) / 2 + 20, id(botones), button_texts[button_index]);
          }
        }
        it.image(45, 20, id(offen), id(orange));
        it.image(155, 20, id(zu), id(grey));
        it.image(45, 95, id(offen), id(orange));
        it.image(155, 95, id(zu), id(grey));
        it.image(45, 170, id(offen), id(orange));
        it.image(155, 170, id(zu), id(grey));

        if (id(Licht).state == "on") {
          it.image(45, 245, id(licht), id(orange));
        } else {
          it.image(45, 245, id(licht), id(grey));
        }
        it.image(155, 245, id(back), id(green));

      } else {
        static int y = 182;
        static int y_direction = 4;  // Velocidad del movimiento
        const int y_min = 180;       
        const int y_max = 187;       

        it.fill(id(black));
        it.strftime(120, 12, id(info), TextAlign::CENTER, "%d/%m/%Y", id(esptime).now());
        it.strftime(120, 43, id(hora), TextAlign::CENTER, "%H:%M", id(esptime).now());
        it.printf(120, 85, id(fetcha), TextAlign::CENTER, "Strom %.0f", id(totalstrom).state);
        it.line(50, 110, 190, 110);
        
        static int current_text_index = 0;
        static float text_timer = 0;
        const float text_interval = 4.0;  // Intervalo para cambiar el texto en segundos

        if (current_text_index == 0) {
          it.image(15, 130, id(hometemperature), id(green));
          it.print(70, 130, id(info), "Innen");
          it.printf(175, 130, id(info), "%.1f C", id(innentemperatur).state);
          it.print(70, 160, id(info), "Luftfeuchte");
          it.printf(175, 160, id(info), "%.1f %%", id(innenluftfeuchte).state);
          it.print(70, 190, id(info), "Absolute");
          it.printf(175, 190, id(info), "%.1f %%", id(absolutinnen).state);

          it.image(15, 230, id(weather), id(orange));
          it.print(70, 230, id(info), "Aussen");
          it.printf(175, 230, id(info2), "%.1f C", id(aussentemperatur).state);
          it.print(70, 260, id(info), "Luftfeuchte");
          it.printf(175, 260, id(info), "%.1f %%", id(aussenfeuchte).state);
          it.print(70, 290, id(info), "Absolute");
          it.printf(175, 290, id(info), "%.1f %%", id(absolutaussen).state);          
        }
      }
1 „Gefällt mir“

@derrodi sieht doch trotzdem schon ganz nett aus. Die Menüleiste unten gefällt mir. :slight_smile:

@stefan13 Kannst du gerne teilen. Wir können das Topic hier ruhig mit solchen Sachen füllen. Da gibt es bestimmt noch andere, die so etwas auch gerne umsetzen möchten. So hat man die Qual der Wahl. :wink:

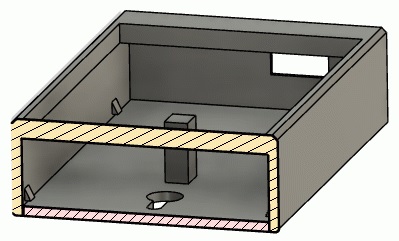
Hier mal die Version 1 des Gehäuses

Ich habe in jedem Zimmer eine Alexa mit der ich bequem steuern kann, möchte aber zudem je so ein Infodisplay überall aufhängen.

Daher will ich das Gehäuse nochmals überarbeiten. Im Moment ist die Rückwand z.B. einfach verklebt, was ja kein Problem ist da Softwareänderungen per ota erfolgen.

[

]
Dateien hier „http://stegem.de/CYD-Gehäuse-V1.zip

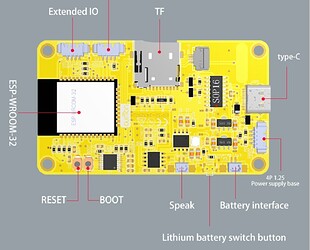
Die Stromversorgung des Displays gefällt mir mit dem nicht mittigen Anschluss nicht wirklich. Deswegen habe ich mir auch diesen Sockel gezeichnet, so dass man das Kabel gar nicht sieht. Werde mal auch nochmal ein, zwei nachbestellen.

@jayjojayson die Stromzufuhr über USB bleibt ja nur so lange bis ich wieder tapeziere, dann ist das in der Wand verschwunden.

Noch ne gute Idee:
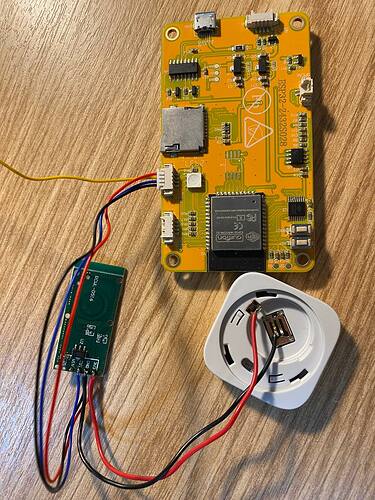
Ich werde noch einen Radarsensor einbauen wegen der Anwesenheitskontrolle und einen Temperatursensor der dann keine Batterie mehr braucht.
So habe ich alles in jedem Raum in einem Gerät, welches ich per WLAN programmieren kann.
Einbindung Radar war kein Problem:

binary_sensor:

  - platform: gpio
    device_class: motion
    pin: 
      number: 22
    name: bewegung_kueche 

Ausserdem kann man die RGB-Led auf der Rückseite noch ansteuern, die scheint dann durchs Gehäuse durch, was richtig cool aussieht.


Also erst mal ein neues Gehäuse zeichnen - bis bald

1 „Gefällt mir“

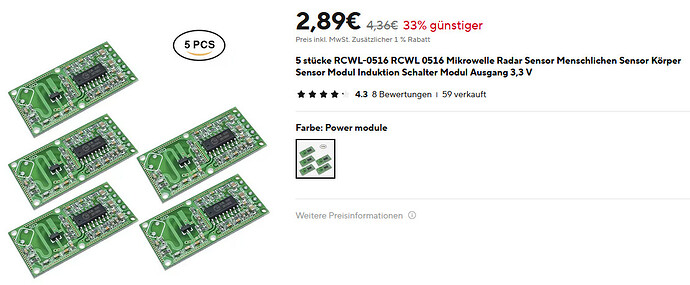
Wirklich eine top Idee mit dem Radarsensor. Was hast du denn da für einen genommen? Die kleine Platine war beim Radar mit drin?

Die RGB hinten hatte ich tatsächlich schon kurz im Einsatz, mit dem Wecker morgens habe ich die Rot blinken lassen, aber mein Gehäuse lässt zu wenig Licht durch, so dass man es eigentlich überhaupt nicht sieht. Daher habe es erstmal wieder ausgeschaltet.

die da bei ali:

1 „Gefällt mir“

Vielen Dank, werden heute noch bestellt. :slight_smile:

Ich kann nur die empfehlen. Brauchen nur Strom und arbeiten mit Bluetooth

[Ich habe das hier gerade auf AliExpress gefunden: 13,08€ | Hi-Link HLK-LD2410 LD2410B LD2410C 5V Mini FMCW 24G Smart Human Presence Status Sensor Radar Modul Unterhaltungselektronik Hi-Link HLK-LD2410 LD2410B LD2410C 5V Mini FMCW 24G Smart Human Presence Status Sensor Radar Modul Unterhaltungselektronik - AliExpress 502]

Ach vergesst mal, das Display hat ja garkein Bluetooth :face_with_peeking_eye:

1 „Gefällt mir“

Habe mich gerade schon gewundert und die drei Kabel sind schnell gelötet. :slight_smile:

Da haste recht. Hab von den anderen nur noch einige zu liegen :nerd_face:

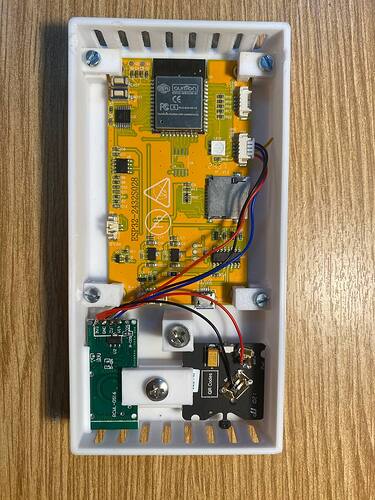
Neues Gehäuse ist fertig:


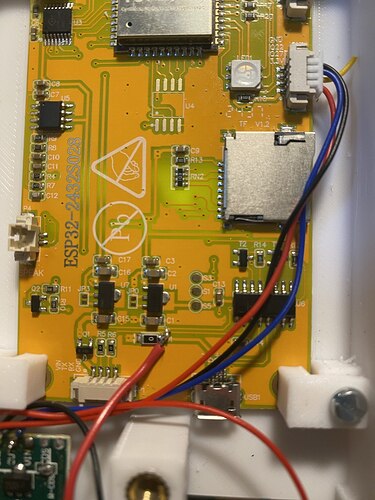
Die 5V Stromversorgung muss an die SMD-Diode!!! Dickes Rotes Kabel

2 „Gefällt mir“